Installing and running Docker:
If you do not already have Docker installed on your computer, you should install it. Go to https://www.docker.com/products/docker-desktop/ and install the Docker Desktop software for your system. I already have it installed.
Start the Docker Desktop app on your system.
Creating the Dockerfile:
Create a file called ./backend/Dockerfile and add the following code:
|
1 2 3 4 5 6 7 8 9 10 11 12 13 14 15 16 17 18 19 20 21 |
FROM python:3.11.2-slim-buster WORKDIR /usr/src/backend ENV PYTHONDONTWRITEBYTECODE 1 ENV PYTHONUNBUFFERED 1 RUN apt-get update \ && apt-get -y install netcat gcc postgresql \ && apt-get clean RUN pip install --upgrade pip COPY ./requirements.txt /usr/src/backend/requirements.txt RUN pip install -r requirements.txt COPY ./entrypoint.sh /usr/src/backend/entrypoint.sh RUN chmod +x /usr/src/backend/entrypoint.sh COPY . . ENTRYPOINT [ "/usr/src/backend/entrypoint.sh" ] |
Note: there are now two backend directories. We will be referring to the first one with the manage.py file.
Let’s go over this code:
- FROM python:3.11.2-slim-buster: We set the base image that will be used to build our image. It uses Python 3.11.2 on Debian Buster (slim version), which is a minimal version of Debian.
- WORKDIR /usr/src/backend: We set the working directory inside the container to /usr/src/backend. Any subsequent commands will be executed relative to this directory.
- The following two lines set environment variables for Python. PYTHONDONTWRITEBYTECODE prevents Python from writing pyc files to disk, and PYTHONUNBUFFERED ensures that Python outputs are sent straight to stdout/stderr without being buffered.
- RUN apt-get update \: We update the package index inside the container.
- && apt-get -y install netcat gcc postgresql \: We install the necessary packages inside the container. This includes netcat, gcc, and postgresql.
- && apt-get clean: We clean up the package cache to reduce the size of the Docker image.
- RUN pip install –upgrade pip: We upgrade pip, the Python package installer, to the latest version.
- COPY ./requirements.txt /usr/src/backend/requirements.txt: We then copy the requirements.txt file from the host machine into the /usr/src/backend directory in the container.
- RUN pip install -r requirements.txt: We install the dependencies listed in requirements.txt using pip.
- COPY ./entrypoint.sh /usr/src/backend/entrypoint.sh: We then copy the entrypoint.sh script from the host machine into the /usr/src/backend directory in the container.
- RUN chmod +x /usr/src/backend/entrypoint.sh: This line makes the entrypoint.sh script executable.
- COPY . .: Next, we copy the entire current directory from the host machine into the /usr/src/backend directory in the container. This includes your Python application code.
- ENTRYPOINT [ “/usr/src/backend/entrypoint.sh” ]: Finally, we set the default command to execute when the container starts. In this case, it’s the entrypoint.sh script.
Our Dockerfile is now ready. Next, let’s create the entrypoint.sh file.
Creating the entrypoint.sh file:
Create the ./backend/entrypoint.sh file and add the following code:
|
1 2 3 4 5 6 7 8 9 10 11 12 13 14 15 16 17 |
#!/bin/sh if [ "$DATABASE" = "postgres" ] then echo "Waiting for postgres..." while ! nc -z $SQL_HOST $SQL_PORT; do sleep 0.1 done echo "PostgreSQL started" fi python manage.py flush --no-input python manage.py migrate exec "$@" |
This is a shell script that will run when the container starts. Let’s go over this code:
- First, the script checks if the $DATABASE environment variable is set to “postgres“.
- If $DATABASE is set to “postgres“, it waits for the PostgreSQL server to start by repeatedly attempting to connect to it using nc (netcat) until successful.
- Once PostgreSQL is up, it echoes “PostgreSQL started”.
- It then flushes the database using python manage.py flush –no-input, which clears all data from the database without asking for confirmation.
- Finally, it runs Django migrations using python manage.py migrate.
- exec “$@” is used to execute any additional command-line arguments passed to the script.
Before we move to the next, we will need to make the entrypoint.sh file executable as a program. To do that, run the command:
|
1 |
chmod +x ./entrypoint.sh |
Creating the Docker-compose file:
Create the docker-compose.yml file inside the root directory of your project and add the following code:
|
1 2 3 4 5 6 7 8 9 10 11 12 13 14 15 16 17 18 19 20 21 22 23 24 25 |
version: '3.8' services: backend: build: ./backend command: python manage.py runserver 0.0.0.0:8000 volumes: - ./backend/:/usr/src/backend/ ports: - 8000:8000 env_file: - ./backend/.env depends_on: - database database: image: postgres:15 volumes: - postgres_data:/var/lib/postgresql/data/ environment: - POSTGRES_USER=backend - POSTGRES_PASSWORD=backend - POSTGRES_DB=backend_db volumes: postgres_data: |
This configuration sets up two services: backend and database. Let’s go over them:
- backend service:
- build: ./backend: This line specifies that the Dockerfile for the backend service is located in the ./backend directory.
- command: python manage.py runserver 0.0.0.0:8000: This is the command that will be executed when the container starts. It runs a Django server listening on all available network interfaces (0.0.0.0) on port 8000.
- volumes: ./backend/:/usr/src/backend/: This mounts the local ./backend/ directory into the container at /usr/src/backend/. This is useful for development, as it allows you to make changes to your code without needing to rebuild the Docker image.
- ports: 8000:8000: This maps port 8000 of the host machine to port 8000 of the container, allowing you to access the Django server from your host machine.
- env_file: ./backend/.env: This specifies an environment file containing environment variables for the backend service. These variables are used by Django for configuration.
- depends_on: – database: This ensures that the backend service waits for the database service to be fully started before starting itself. However, it doesn’t wait for the database to be ready to accept connections.
- database service:
- image: postgres:15: This line specifies the Docker image to use for the database service. It pulls the PostgreSQL version 15 image from Docker Hub.
- volumes: postgres_data:/var/lib/postgresql/data/: This creates a Docker volume named postgres_data and mounts it to the PostgreSQL data directory within the container. This ensures that data persists between container restarts.
- environment: – POSTGRES_USER=backend – POSTGRES_PASSWORD=backend – POSTGRES_DB=backend_db’: These environment variables configure the PostgreSQL database:
- POSTGRES_USER: Sets the username for the database to backend.
- POSTGRES_PASSWORD: Sets the password for the backend user to backend.
- POSTGRES_DB: Sets the name of the default database to backend_db.
- volumes:
- postgres_data: This defines a named volume for storing PostgreSQL data. Named volumes are a way to persist data generated by Docker containers.
This configuration sets up a development environment for a Django application with a PostgreSQL database. The backend service runs the Django server, while the database service provides the PostgreSQL database backend.
Creating the environment file:
As mentioned above, we will use an environment file called .env to keep our environment variables. We will only use this for development purposes. Create the ./backend/.env file and add the following code:
|
1 2 3 4 5 6 7 8 9 10 |
DEBUG=1 SECRET_KEY=foo DJANGO_ALLOWED_HOSTS=localhost 127.0.0.1 [::1] SQL_ENGINE=django.db.backends.postgresql SQL_DATABASE=backend_db SQL_USER=backend SQL_PASSWORD=backend SQL_HOST=database SQL_PORT=5432 |
Let’s go over this code:
- DEBUG=1: The DEBUG setting takes a true or false value. When set to true, it enables Django’s debug mode, which provides detailed error pages when an error occurs. The environment file can only take boolean values; we therefore set it to 1 which will be converted to an integer later in our settings.py file. Note: debug mode should be enabled only during development, not in production.
- SECRET_KEY=foo: This is a cryptographic key used by Django for session management, CSRF protection, and other security-related functionality. It should be a long, random string and kept secret. In this case, it’s set to a placeholder value foo, which is not secure for production use.
- DJANGO_ALLOWED_HOSTS=localhost 127.0.0.1 [::1]: This variable specifies a list of host/domain names that the Django application is allowed to serve. In this case, it allows requests from localhost, 127.0.0.1, and [::1] (IPv6 loopback address).
- SQL_ENGINE=django.db.backends.postgresql: This specifies the database backend engine for Django. It’s set to use PostgreSQL.
- SQL_DATABASE=backend_db: This is the name of the PostgreSQL database that Django will use.
- SQL_USER=backend: This is the username for accessing the PostgreSQL database.
- SQL_PASSWORD=backend: This is the password for the PostgreSQL user specified above.
- SQL_HOST=backend-db: This is the hostname of the PostgreSQL database server. In this case, it’s set to backend-db, which corresponds to the service name defined in our Docker Compose file (database service).
- SQL_PORT=5432: This is the port on which the PostgreSQL database server is listening. The default port for PostgreSQL is 5432.
These environment variables are essential for configuring our Django application to connect to the PostgreSQL database service defined in our Docker Compose configuration. Note: Make sure to replace placeholder values like foo and backend with secure and appropriate values, especially in a production environment.
Updating the settings.py file:
We need to update the settings.py file to use the environment variables defined above.
First import the os python module with the command below.
|
1 |
import os |
We will use the os module to access the environment variables by using os.environ.get(). The os.environ.get() method is used to retrieve the value of an environment variable. It takes one argument, which is the name of the environment variable you want to retrieve.
Next, let’s make sure that the SECRET_KEY, DEBUG and ALLOWED_HOSTS settings get their values from the environment file. Update them as shown below:
|
1 2 3 4 5 6 |
SECRET_KEY = os.environ.get('SECRET_KEY') # SECURITY WARNING: don't run with debug turned on in production! DEBUG = int(os.environ.get('DEBUG')) ALLOWED_HOSTS = os.environ.get('DJANGO_ALLOWED_HOSTS').split(' ') |
Let’s go over the code:
- SECRET_KEY is set to the value of the environment variable named ‘SECRET_KEY‘.
- DEBUG is set to the integer value of the environment variable named ‘DEBUG‘. Note: The os.environ.get() method returns a string so we need to convert it to an integer with the int() method.
- ALLOWED_HOSTS is set to a list of host/domain names obtained by splitting the value of the environment variable named ‘DJANGO_ALLOWED_HOSTS‘ using the space character as a delimiter. Note: This way we can allow multiple host or domain names.
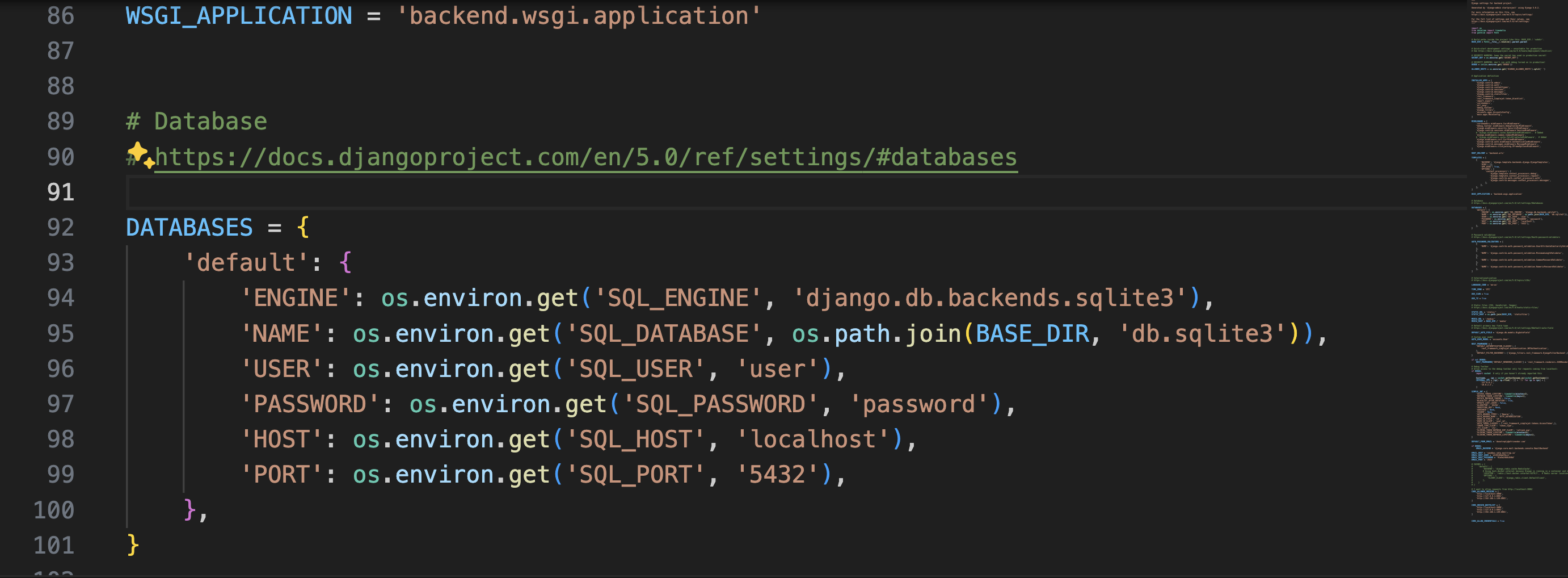
Finally, let’s update the database settings to use the environment variables as well.
|
1 2 3 4 5 6 7 8 9 10 |
DATABASES = { 'default': { 'ENGINE': os.environ.get('SQL_ENGINE', 'django.db.backends.sqlite3'), 'NAME': os.environ.get('SQL_DATABASE', os.path.join(BASE_DIR, 'db.sqlite3')), 'USER': os.environ.get('SQL_USER', 'user'), 'PASSWORD': os.environ.get('SQL_PASSWORD', 'password'), 'HOST': os.environ.get('SQL_HOST', 'localhost'), 'PORT': os.environ.get('SQL_PORT', '5432'), }, } |
Just like before we are using the os.environ.get() method to set the database settings values. However, in this case, we are passing in a second argument that represents the default value in case the environment variable cannot be found.
Your project should look like this.
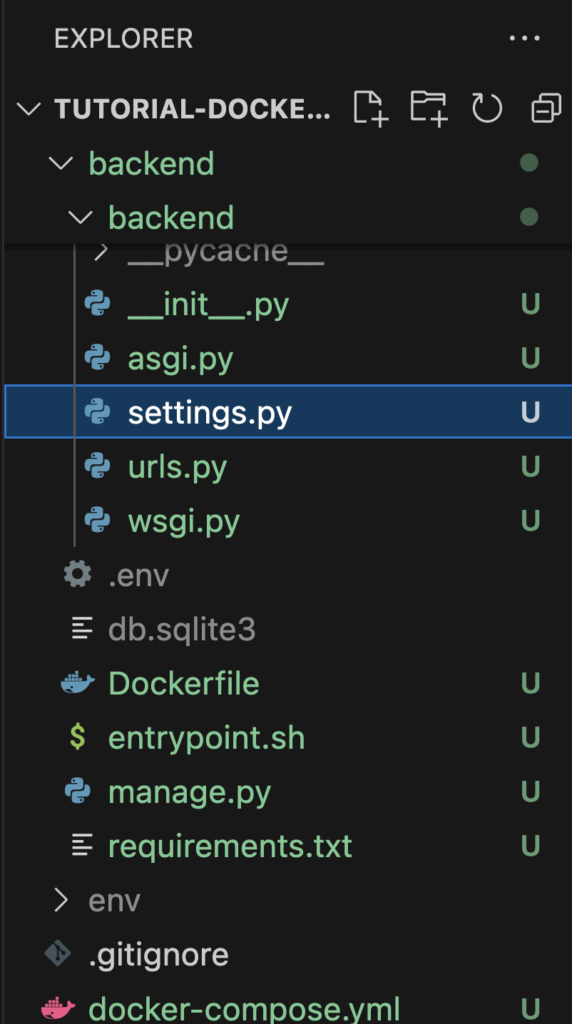
Note: You can refer to the project source code to check that you have the same project structure.
The dockerization is now done. Let’s test that it’s working.
Running our app in docker:
First, we will need to build the image by running the command below in your project root folder (where you have the docker-compose.yml file):
|
1 |
docker-compose build |
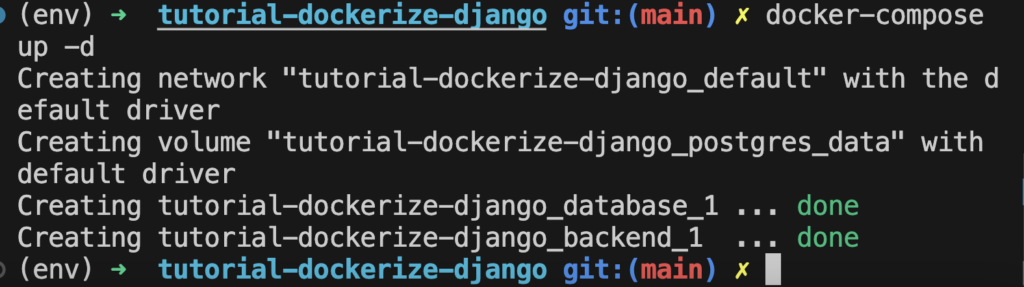
After the image has been built, we can now run the container with the following command:
|
1 |
docker-compose up -d |
Note: We could have run the following command to both build the image and run the container.
|
1 |
docker-compose up -d --build |
Your container should be running and your services should be up. The output should be something like below:
To check that the services are running you can use the following command:
|
1 |
docker ps -a |
This command will show all the running containers.

Go to 127.0.0.1:8000 in your browser to see your app running.
That’s it. We were successfully able to dockerize our Django application.
Further learning:
To learn more about the different technologies we used you can go to:
Project source code:
You can find the entire source of the project here.